Ability Multiplier Text UI
One of the first things I did this week was add a UI element to the HUD to indicate to the player the Ability Multiplier strength. This was surprisingly difficult to pull off, as I had to modify the UI of the ability selection scene a couple of times to get all the alignment elements to work, but eventually I was able to get it hooked up to the AbilitySelectionHUD.cs script.
Bouncing Issues
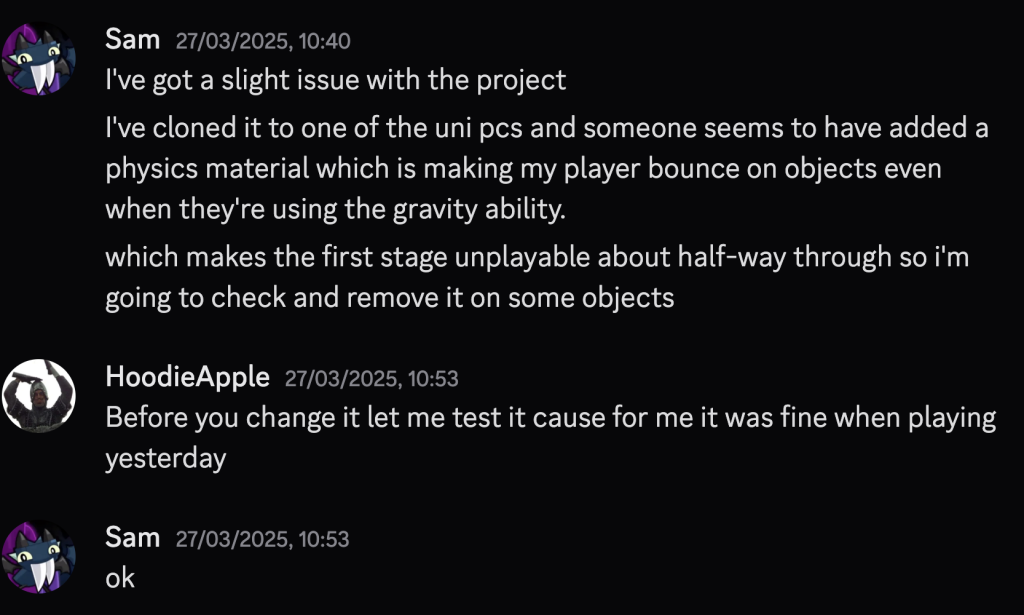
Playtest 1 (Thursday)
There was a play testing session for all of the groups projects on Thursday, where people could come in and test the groups games out. The event was fairly busy, and I wasn’t able to write any notes, but my teammates did and Guy shared what I needed to do on Discord.
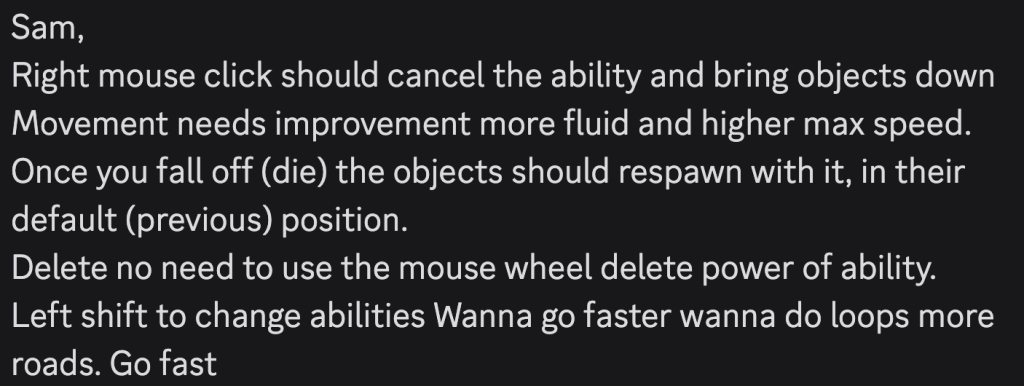
I immediately began to work on fixing these issues. I asked Guy for clarification on the last point as I wasn’t sure what he meant and he didn’t respond.
Checkpoints
One of the suggestions I got from Guy while we here play testing the game on Thursday was to add checkpoints to the game. This would involve some rewriting of the code, particularly in the GameManager script, where the game scene reloaded when the player died.
One of the first things I did for this was create a GameObject called Checkpoints and a script of the same name. The functionality of this script is fairly simple, when the player passes through the GameObject’s trigger, it checks to see if the bool for (insert name) is active, if it is, the function returns. If it isn’t, then the Object will tell the GameManager’s variable what position it is, the bool will then become true.
public class Checkpoint : MonoBehaviour
{
    private bool _hasPassedCheckpoint;
    private GameManager _gameManager;
    public TextMeshProUGUI checkpointReachedTxt;
    [SerializeField] private Vector3 checkpointPositionOpen;
    [FormerlySerializedAs("_xPosition")] public float xPosition = 420f;

    private void Start()
    {
        _gameManager = FindObjectOfType<GameManager>();
    }

    private void OnTriggerEnter(Collider other)
    {
        if (!other.gameObject.CompareTag("Player") || _hasPassedCheckpoint) return;
        // set _hasPassedCheckpoint;
        _hasPassedCheckpoint = true;
        // Set checkpoint in GameManager.
        _gameManager.lastCheckpoint = transform.position;
        // Indicate in UI that player has passed checkpoint.
        checkpointReachedTxt.gameObject.SetActive(true);
        // Set a coroutine to disable UI after 3 seconds.
        StartCoroutine(ResetCheckpointReachedTxt());
    }

    IEnumerator ResetCheckpointReachedTxt()
    {
        yield return new WaitForSeconds(3f);
        checkpointReachedTxt.gameObject.SetActive(false);
    }
}
When the player dies, the GameManager will first disable the player character, then after a few seconds it will set the player’s location to that of its last checkpoint and then reenable the player object.
    public IEnumerator ResetGame()
    {
        _player.gameObject.SetActive(false);
        yield return new WaitForSeconds(_reloadTime);
        ResetPlayerAtCheckpoint();
        ResetInteractables();
    }
void ResetPlayerAtCheckpoint()
{
_player.transform.position = lastCheckpoint;
_player.gameObject.SetActive(true);
var rb = _player.GetComponent<Rigidbody>();
rb.velocity = Vector3.zero;
}Ability Multiplier Removal
One of the pieces of feedback I got from this play testing session was to remove the ability multiplier and replace it with a fixed number that’d be used for the gravity ability. This was fairly easy to do. All I really had to do was yank out the scrolling functions that the PlayerInput, which severed the ability entirely. There was already a variable that managed the amount of force an object would get, so I simply doubled it.
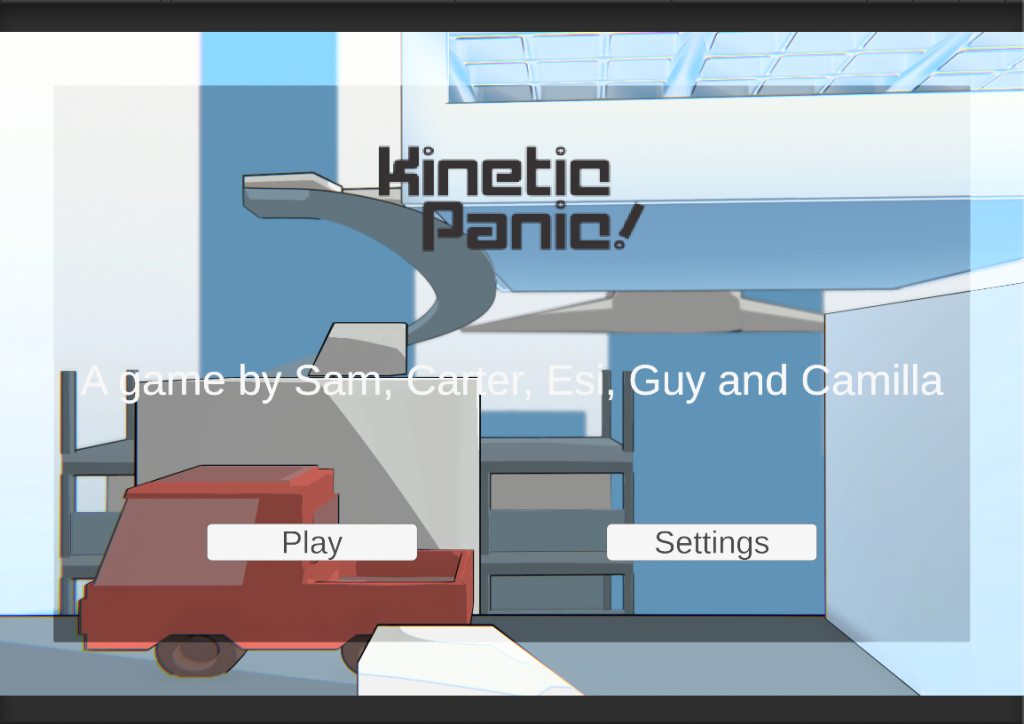
Main Menu/Settings
To prepare for the play test the following day I also worked to make a Main Menu and a Settings screen for the game, that way, it wouldn’t immediately jump into the action.
The first thing I did for the Main Menu and the Settings was to make a new scene called menu by duplicating a previous scene and deleting most of the game-related objects in the scene, including the player. I kept the world though for a backdrop and the EventSystem to ensure the UI worked.
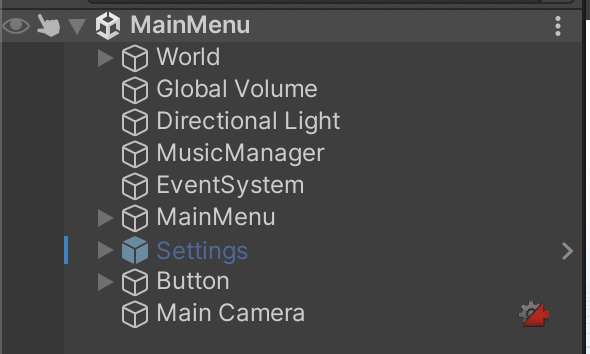
As you can see, there are 2 GameObjects called MainMenu and Settings, which are both Canvas. They also have their own scripts, mainly disable one and enable the other. The MainMenu script also has a play button, which opens the game, while the settings script has a few more functions relating to adjusting the in-game settings. At the moment it doesn’t do much but I expanded upon the script in the following week.
public class MainMenu : MonoBehaviour
{
    [SerializeField] GameObject settingsMenu;
    public void StartGame()
    {
        SceneManager.LoadScene(SceneManager.GetActiveScene().buildIndex + 1);
    }

    public void OpenSettingsMenu()
    {
        settingsMenu.SetActive(true);
        gameObject.SetActive(false);
    }
}
I’d also obtained a logo by contacting Parker, who instructed me to go to the game’s GDD page.
Cool Down
One suggestion I got from Guy was to create a cooldown for the player’s abilities. This was easy to do and I was able to get it down the same day.
What I did was this: I made a new bool variable called _abilityIsCoolingDown. If the player attempts to get up the ability menu, and _abilityIsCoolingDown is true, then the function will return and the player won’t able to cast an ability. Then, in the Casting function, I will start a Coroutine called CoolDownAbility which will make _abilityIsCoolingDown to true, wait for the cooldownTime variable, currently 5 seconds, and then turn it to false.
public void OnAbilityInteract(InputAction.CallbackContext context)
{
    if (_abilityIsCoolingDown) return;
}

private void Casting()
    {
        // enable cinemachine
        cinemachineCamera.gameObject.SetActive(true);
        abilitySelectionHUD.gameObject.SetActive(false);
        selectionArea.gameObject.SetActive(true);
        PerformAbility(currentAbility, selectionArea.GetObjects(), selectionArea.GetRadius());
        abilityCharge--;
        Debug.Log($"Ability Charge: {abilityCharge}");
        selectionArea.gameObject.SetActive(false);
        _abilityStageIndex = 0;
        StartCoroutine(CoolDownAbility());
}


IEnumerator CoolDownAbility()
    {
        _abilityIsCoolingDown = true;
        yield return new WaitForSeconds(cooldownTime);
        _abilityIsCoolingDown = false;
    }
Playtest 2 (Friday)
The second playtest took place on a Friday at 10:30 AM. One mistake I’d made was not realizing that the playtest would take place on the same day and time as my business studies lesson. However, it turned out alright in the end since there wasn’t much teaching going on for that day and in fact, she encouraged the class to go to the computer rooms to try out the game.
The first person to try out the game was my business studies teacher. I could see that she was struggling with knowing what to do in the game and, a common theme throughout the playtests, didn’t know where to go.
In total, I had about 7 people play the game, about about a quarter of those providing feedback, so overall, a decent turnout, even if it didn’t match that of Thursdays play testing, it was a more calm environment.
In the next week, I implemented changes based on the feedback I had gotten from the previous playtest session.