Skip to content

E-Jay Tripoli

A documentation of my work for Year 2 – Studying Games Design and Art at the University of Southampton

Menu
  • Lament
    • Development
      • Procedural Room Generation
        • PRG – Pt 1
        • PRG – Pt 2
        • PRG – Pt 3
        • PRG – Pt 4
        • PRG – Pt 5
      • Dungeon
        • Stalagmites
        • Pitfalls
        • Health Potion
        • Dungeon Bug Fixing
      • Player
        • Player – Pt 1
        • Player – Pt 2
        • Player – Pt 3
        • Player – Pt 4
        • Player – Pt 5
      • UI/HUD
        • Start Menu – Pt 1
        • General UI
        • Skill Tree – Pt 1
        • Skill Tree – Pt 2
        • Skill Tree – Pt 3
        • Skill Tree – Pt 4
        • Skill Tree – Pt 5
        • Skill Tree – Pt 6
      • Enemies
        • Whispers – Pt 1
        • Whispers – Pt 2
        • Wrought – Pt 1
        • Wrought – Pt 2
        • Boss
      • Scenes
        • Tutorial
        • Hub
        • Depression Gate
        • Gateway Scenes
    • Logs
      • Initial Plan
      • Teamwork
        • GitHub
        • Discord
      • Weekly Logs
        • User Analysis
        • Accessibility
        • Testing
        • Marketing
        • Formative Feedback
      • Playtests
        • Playtest 1
        • Playtest 2
        • Playtest 3
      • Showcase Event
      • Post-Project Reflection
    • Research
      • Understanding Learning Outcomes
      • Understanding my role
      • Researching Tools
      • Researching Pipelines
      • GDD Breakdown
      • Researching Procedural Generation
      • Existing Games
  • Arcadia GDD
    • Weekly Logs
      • Week 1 – What is a GDD?
      • Week 2 – Game Worlds
      • Week 3 – Concept Art
      • Week 4 – Character Design
      • Week 5 – Narratives
      • Week 6 – Gameplay and Game Systems
      • Week 7 – Feedback week
      • Week 8 – Audio
    • Research
      • Analysing Existing Games
      • Genre Research
      • Research into Psychological Abuse
      • Character Research/Moodboards
      • Environment/Map Research
      • Researching Medieval Knights
      • Researching Enemies
      • UI Research
    • Ideation & Development
      • Initial Development
        • The Essential Experience
        • Initial Game Ideas
        • Choosing a Game Genre
        • Choosing the Game’s Title
      • Game Play
        • Gameplay Loops
        • Mechanics/Tech
      • Story/Narrative
        • Twine
        • Summary of Narrative and Story
      • Game Art
    • GDD
      • Game Overview
      • Game’s Vision
        • Game Pillars
        • Project Focuses
      • Gameplay
        • Mechanics
        • Skills
        • Enemy Behaviour
      • Story & Narrative
        • Twine Prototype
        • Story
        • Narrative
      • Character & NPC Profiles
      • Map/ Level Design
      • UI & HUD
        • Creating the logo
      • Prototype/ Proof of Concept
      • Sound
      • Target Audience
      • Controls & Platform Specs
Menu

Twine

Posted on December 17, 2024 by et4g23

Twine is much more than just a glorified e-book. Although it is used to create stories, the experience of twine is a much more interactive one. Behind the simple passages and choices/links between them, Twine is able to keep track of certain things using variables and code. Here, I will explain how these variables work and how I will use them.

Boolean Variable

A ‘Boolean’ is a variable that consists of one of two types, true or false. This is the most simple type of variable. For my Twine game, this can be used to keep track of many types of things; such as:

  • Do I have a certain type of key?
  • Have I spoken to a certain NPC?

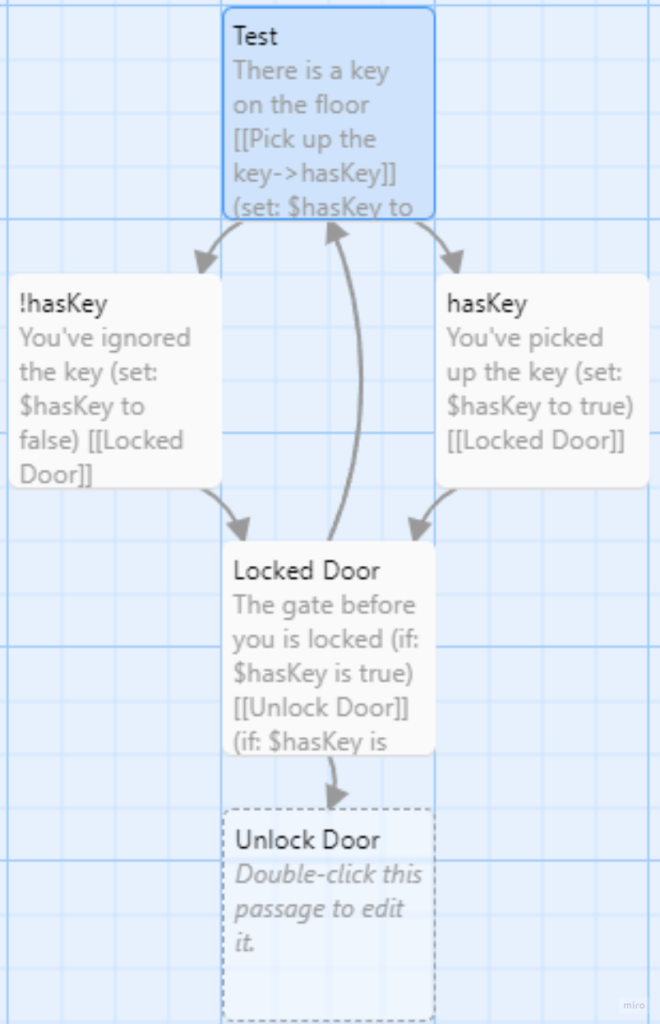
On the left are passages, essentially blocks in which the story will take place. Each of these passages have a ‘body‘, within this body is what the player sees when they play the game; however, this is also where the code is implemented. These lines of code will not be visible to the player during gameplay; hence the rounded and square brackets. Between the square brackets is the code required to create links between passages. The grey arrows are how the player is able to navigate between these passages depending on the choices they make.

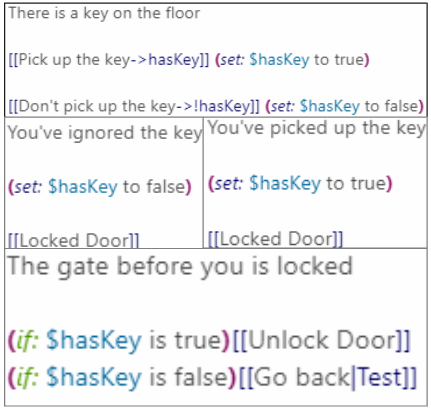
Here, is the contents of each of the passages, with ‘Test’ being at the top with ‘!hasKey’ and ‘hasKey’ following and finally ‘Locked Door’ at the bottom (Unlock Door exists as Locked door has a link to it but it’s body is empty). The square brackets are the links between passages, with the text on the left being what the player will see, and the right being which passage the link will take them to. In the rounded brackets is; the code that sets and changes variables; and the conditional statements that check for the status of these variables.

Leave a Reply Cancel reply

Your email address will not be published. Required fields are marked *

©2025 E-Jay Tripoli | Built using WordPress and Responsive Blogily theme by Superb