Before this project, coding and creating user interfaces in unity was an entirely new experience for me. One of the ways I found to be most effective in learning was instructional videos on youtube. As someone who personally finds it hard to grasp more complex instructional information through text alone, having these visual step by step explanations helped greatly in furthering my understanding. This method of learning is something i would strongly recommend to someone with a similar style of learning to me.
This video was very instructional to me in learning the absolute basics in unity, how to navigate the interface and learning basic coding methods. Despite me learning mostly visually, one text resource I found to be helpful was the unity website, as it offered clear and concise explanations to my problems. One rather frankly embarrassing example of this was when I struggled to access the coding interface within unity. Initially I was very confused, as none of my attempts to open the script environment worked. Using the unity resources I realised that visual studio must be installed separately, as unity does not include a built in scripting interface. Honestly this design choice was perplexing, then i realised it was to allow other programmers more used to other programming programs. This experience led me to reflect more to the unity website itself when I was stuck on a certain thing as it almost always had the answer to be albeit slightly silly questions.
Now that I have created the assets for the menu and was actually able to fully navigate unity having installed visual studio I could get to work creating the settings menu.

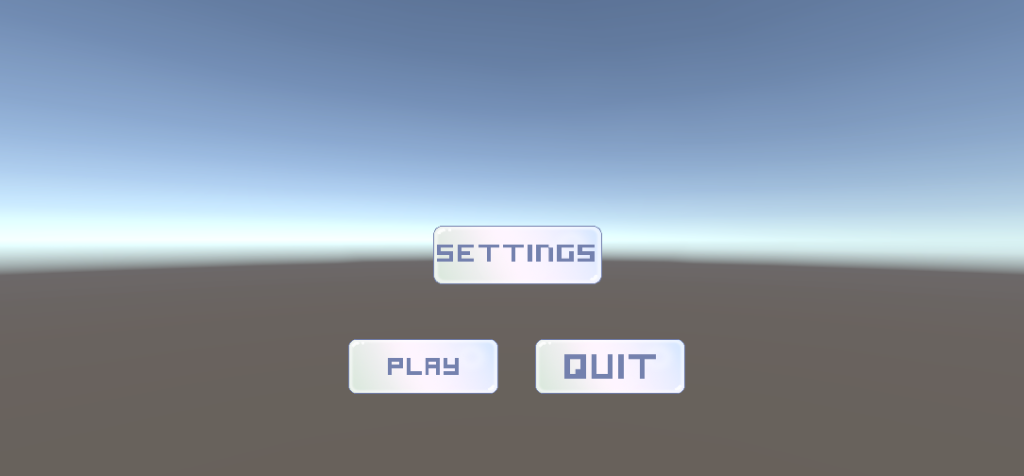
I first created a scene for the main menu. and by using unity’s built in button creator i added a ‘play’ button that doesn’t do anything yet as it doesn’t have any code yet.
I implemented the texture for the button using a design I had previously created in the earlier weeks. To begin, I ensured the texture’s type was set to “Sprite,” allowing it to be the texture for the button. Once the texture was imported, I applied it to the newly created button by changing its sprite image. I followed this same process for all the buttons featured in the interface. Additionally, I removed the default TextMeshPro component that is automatically added when creating a button, as all of my UI design elements already had the text integrated directly into the graphics. This approach helped maintain consistency with the visual style I had planned.
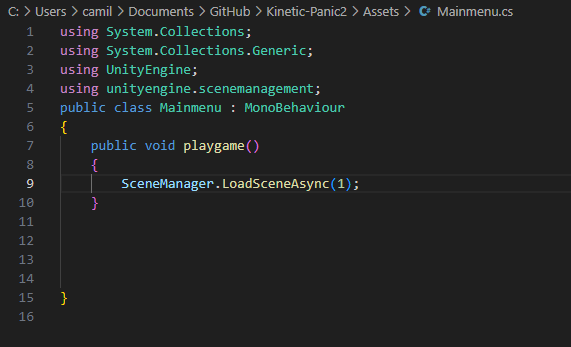
Next it was time to add the code for these buttons to ensure the Main menu itself was functional. I did this by adding on a new script to the main camera of this scene. then opening this script in visual studio.
Now i have written the text so that my play button is functional i need to apply that to my button in unity. To do this I added an event to my play button then dragged and dropped my camera as this where I had written the script. In the event menu I also selected the play game function. now my play button is functional !
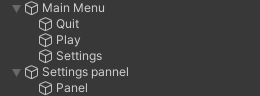
Next I moved onto creating my settings panel. This in itself was surprisingly straight forward. I simple created a new empty within the canvas and created the panel my settings are going to be on.
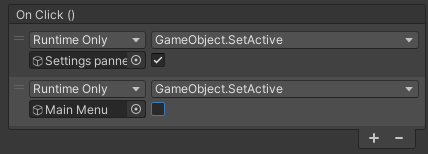
To make the settings button lead you to the settings menu all that was needed to be done was to create a new function and then choose ‘gameoption.setactive’ and checked the box underneath. Now when a player presses the settings button it takes them to the settings screen. I also needed to create another function so that the main menu disappears upon clicking the settings menu. To do this it was a similar process, i made another function and dragged my main menu into the box and choose ‘gameoption.setactive’. Only this time i didn’t check the box underneath this function. This effectively closes the main menu screen.
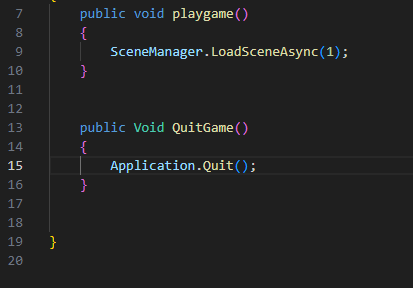
To make the quit button functional i opened the script for the main menu panel and created script for quitting the application. For this i once again created a new function but this time on my quit button and selected the ‘quitgame’ function I had just created.
There were two YouTube videos that greatly helped guide me within this initial process of creating a menu screen.
Without these resources it would’ve made this whole process a much more painful and difficult experience. As i said prior i mostly learn through visuals so having someone explain a concept to me visually is something i find immensely helpful.
- Miscomunication
Unfortunately, during the time I was developing the aesthetics and creating a functional menu and settings screens one of my teammates implemented their own version of these features into the game with no prior warning. Whilst I had been actively communicating through discord that I was in fact working on developing these aspects of the game; tasks that were initially handed out to me by the group at the start of the project, this miscommunication still happened. I understand that as I am still learning and developing my coding skills the process has taken longer then someone more experienced in these areas would expect. Yet I still feel as though this choice should’ve been something that was discussed with me prior as I had no cues to even think someone else would be developing the same task as me; clearer communication would have been highly appreciated as I had only discovered this change through an update to our shared github…
This whole situation highlights the importance of communications with your team, and whilst I did communicate that i was working on this particular aspect of the game maybe this was something that was missed by my teammate? As I understand it may be hard to fully communicate when not doing so in person. The lack of in person communication with me and this teammate is something i will take the blame for, as for the past few weeks I’ve not been able to regularly attend due to doctors appointments. But this is something I’ve communicated with my teammates through discord.
Honestly this whole situation was a little bit frustrating to have to navigate. As i had worked hard to learn these basics; hence why I’ve kept them in.
- Adding my design elements to this new version of the title screen.
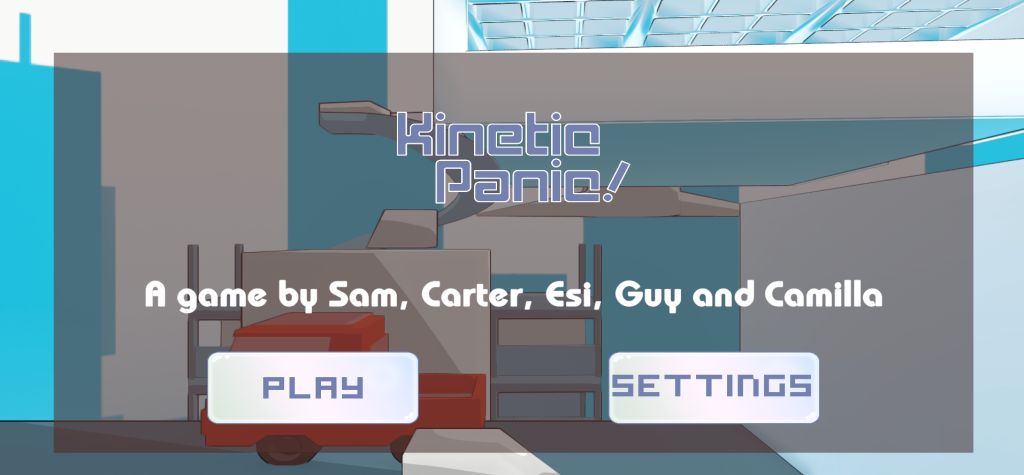
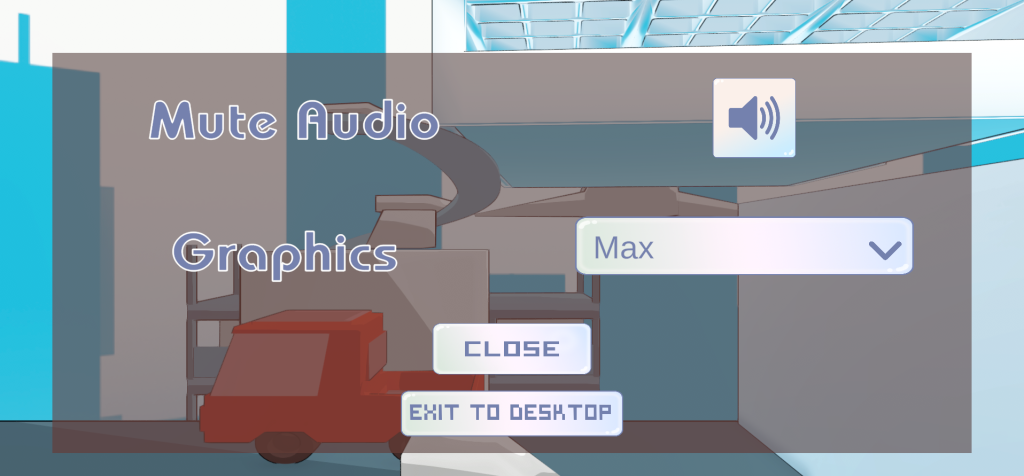
Despite this strange and rather abrupt change I still implemented my own Ui designs that I had worked hard on within this alternate version of the menu and settings screen. Similar to what I discussed earlier I simple imported my existing artwork I had created previously and added them into unity as sprites. I added them to their relative buttons, this addition of aesthetic cohesiveness within the menu and title screen adds a lot to the game, not only visually but also narratively as it better fits in with the gameplay. I edited some aspects of this title screen and fixed a bug where the graphics dropdown became obstructed by the top of the players screen. I also changed to text of the title to the vector I had previously made of parkers initial design, I feel as though it fits in much better with the title screen and the white outline helps to make it more clearly readable.